The archives
Return to the
Now spinning
page
Explorations, a full year
January - December 2009
07 December 2009
It's been a quiet time without many words.
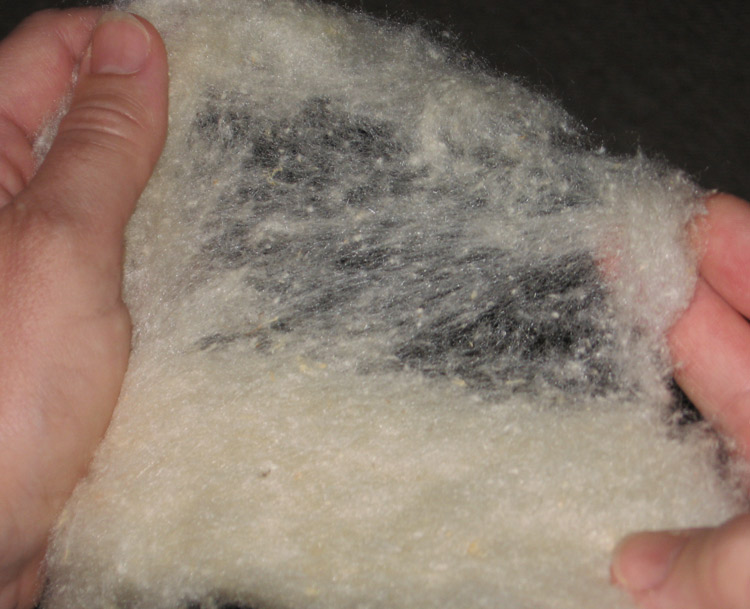
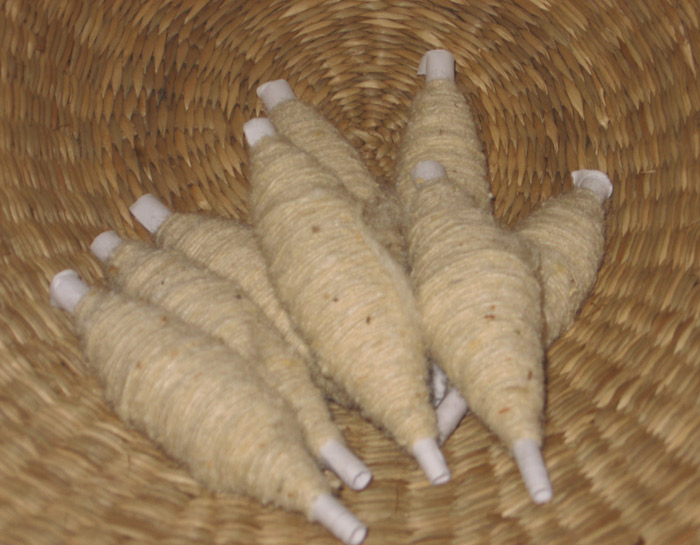
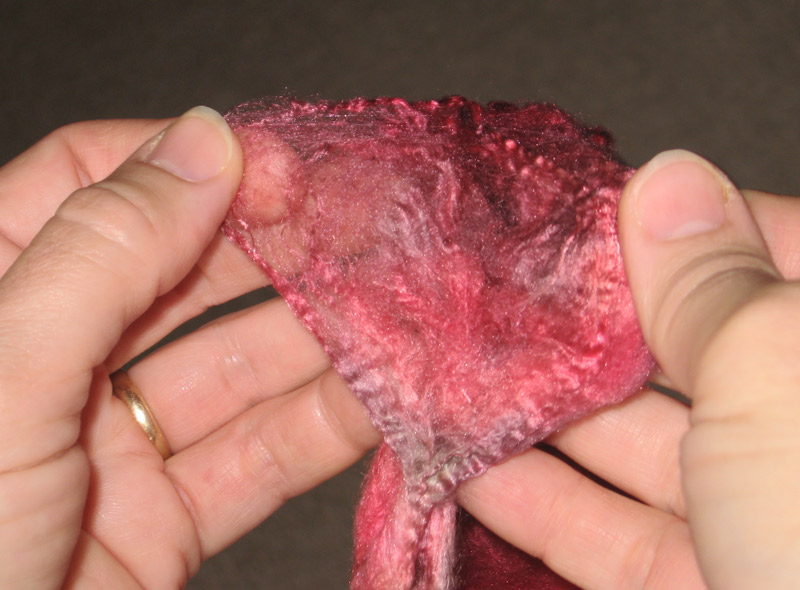
One day in November, from a place deep in the quietness, a large bag of variegated merino roving beckoned.
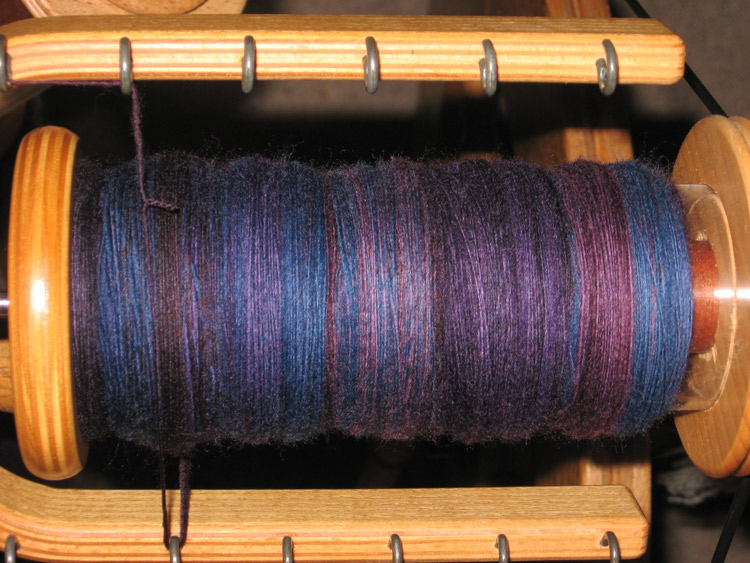
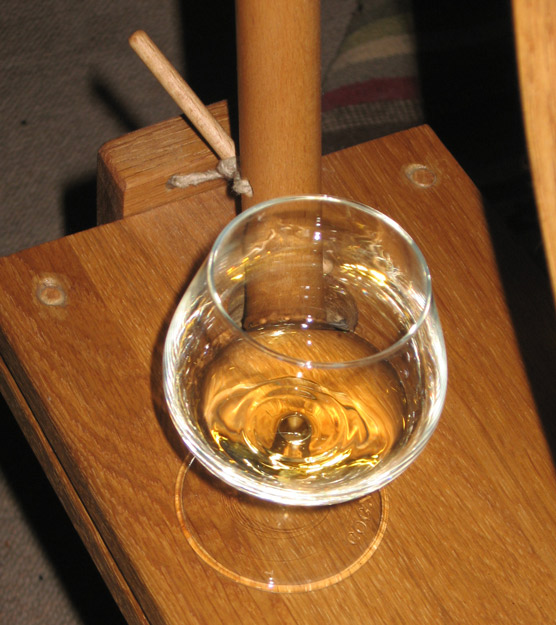
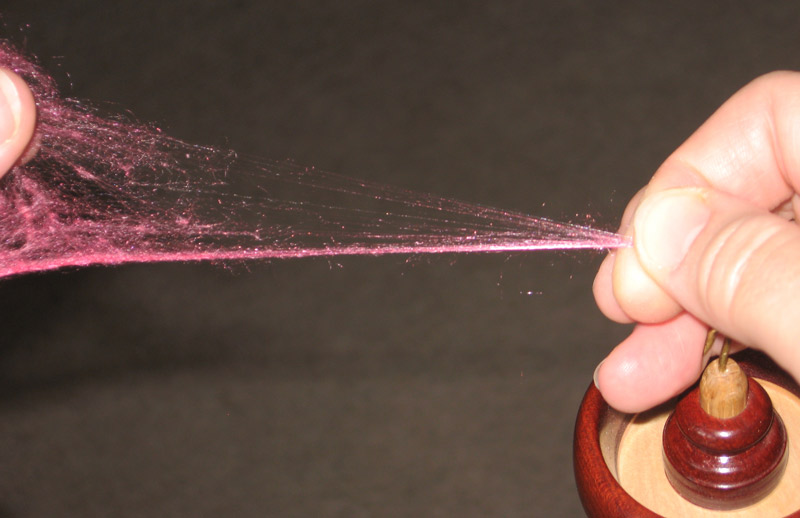
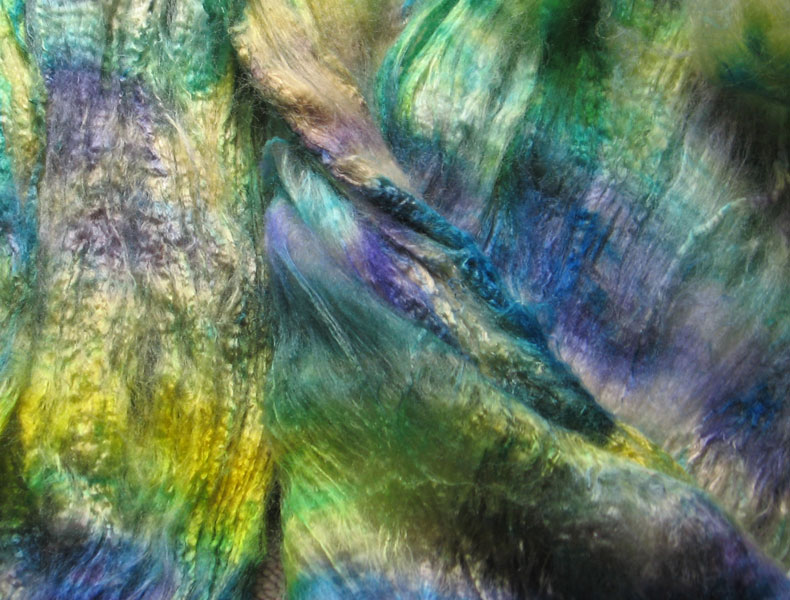
This roving was a gift from a friend who thought it would be better off in my stash than in hers. It looked at first like a modest amount of wool -- but when I opened the bag, it grew amazingly. Alarmed, I started spinning right away. To my delight, it made a very nice singles (left) with a wider array of colour than the roving had led me to imagine. The wool's long imprisonment in the baggie made it stiff to draft, and that stiffness had consequences: the yarn has slight variations in diameter that are subtle in the singles, but will be more pronounced in the final plied yarn. (You can barely see the variations in the photo, but they're there. Merino has a way of puffing itself when it's plied and washed, and all those variations will show when it's all done!)
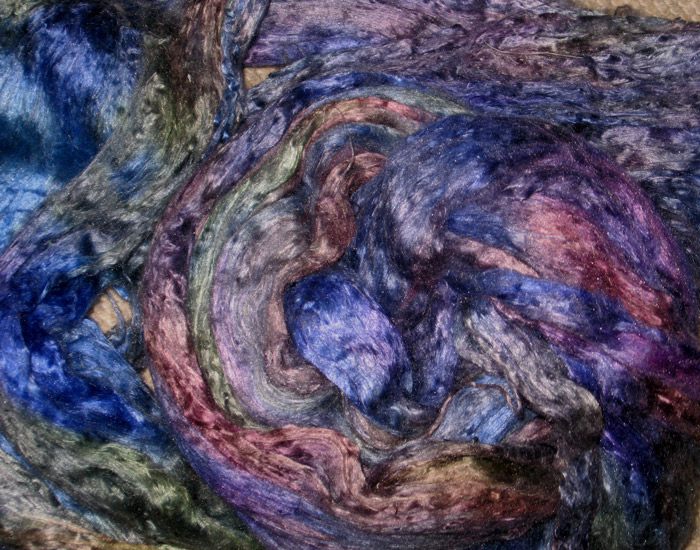
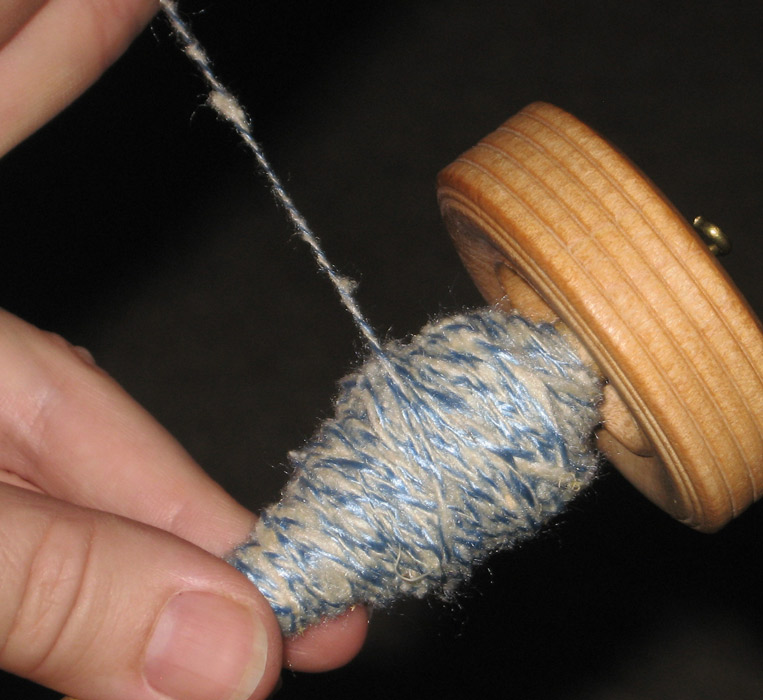
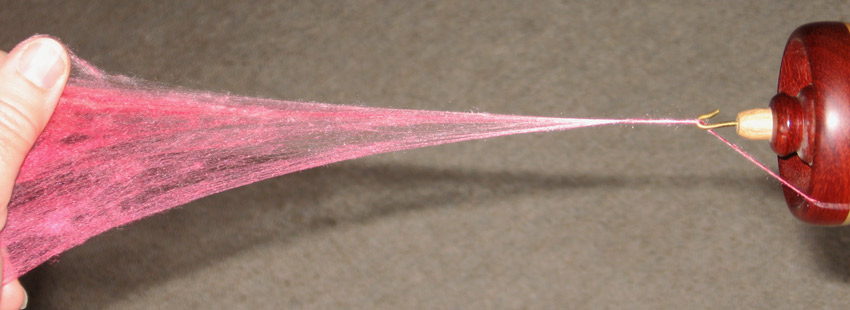
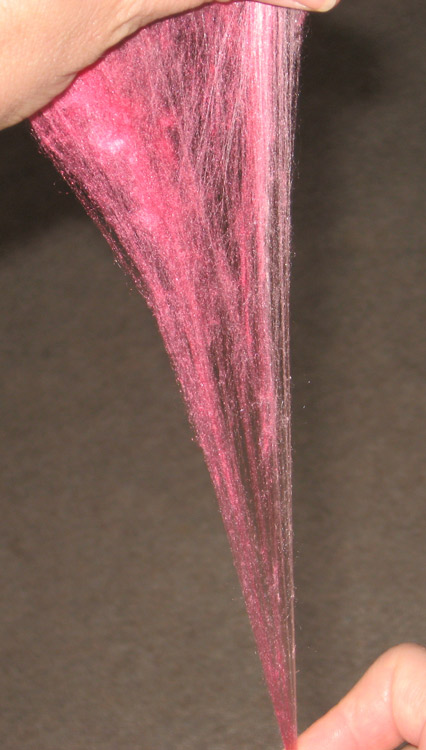
Even if you're not a quirky spinner, personal quirks will work their way to the fore eventually. This was one of those. Having spun two bobbins' worth of merino singles, I yearned desperately for some sheen! I suddenly remembered buying a beautiful space-dyed silk brick last year... and by some miracle I actually found it! It is cultivated silk, and its colours looked like just the thing to liven up the merino variegations. Shiny, livening colours for the not-at-all-shiny merino. Just the ticket.
It's an undiluted pleasure to spin cultivated silk on a spindle wheel! This photo washes the colours out a bit, but you can get a sense of the soft variegations through a wide colour range -- and (of course) the irresistible sheen. (Click on the little picture to see more detail.)
The addictive thing about silk is the way it flows from your hands into the yarn like a magical liquid. You may start out thinking about what you're doing, but after just a short while you're simply watching it happen, a delighted observer watching the shiny mass in your hands transform itself into a smooth, solid thread, gleaming and sensual. It's a tactile meditation. The world becomes calm and quiet, all of existence focusses on the lovely, shimmering thread and the rhythms of drafting, then easing the yarn onto the spindle.
There's nothing quite like it.
It was a disappointment to finish spinning the second cop of silk singles, because it meant I'd need to take a break from the silk and move on to something else.
This won't surprise you: the disappointment was short-lived. Plying presented another set of delightful choices. I had two bobbins of merino singles, two cops of silk, and only vague ideas of what to do with the finished yarn. The world was open, there were no limits, everything was possible -- it was great. :-)
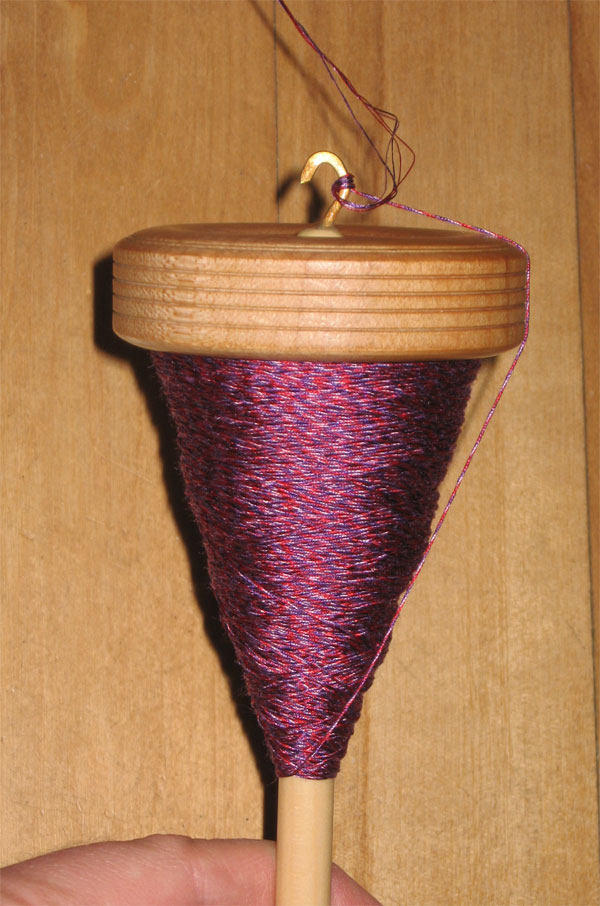
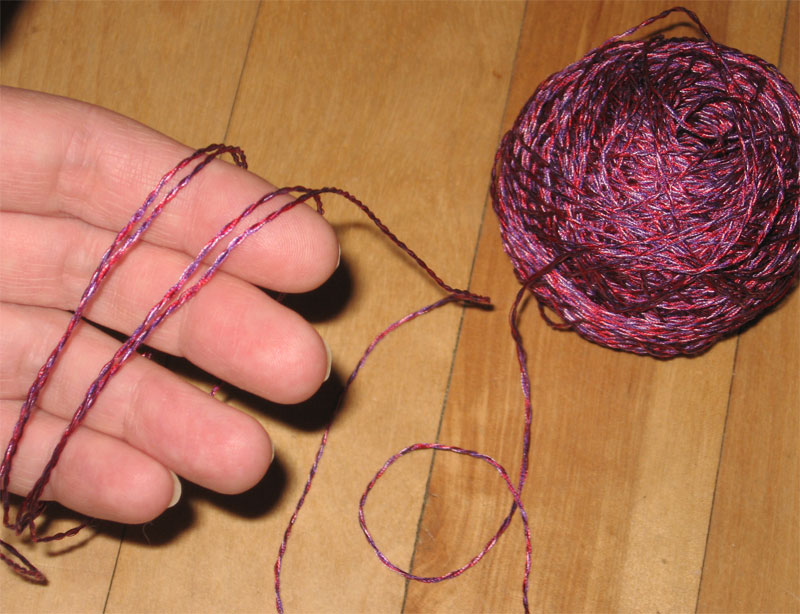
A few quick samples later, I had the answer to all questions: two plies of merino and one ply of silk, to make a 3-ply yarn with a comfortably "round" profile. The final yarn would become the weft in a luxuriant scarf for my husband (shhh -- don't tell!). Because all the singles yarns are variegated, a 3-ply structure would soften the colour shifts while still letting the variations in colour do their magic.
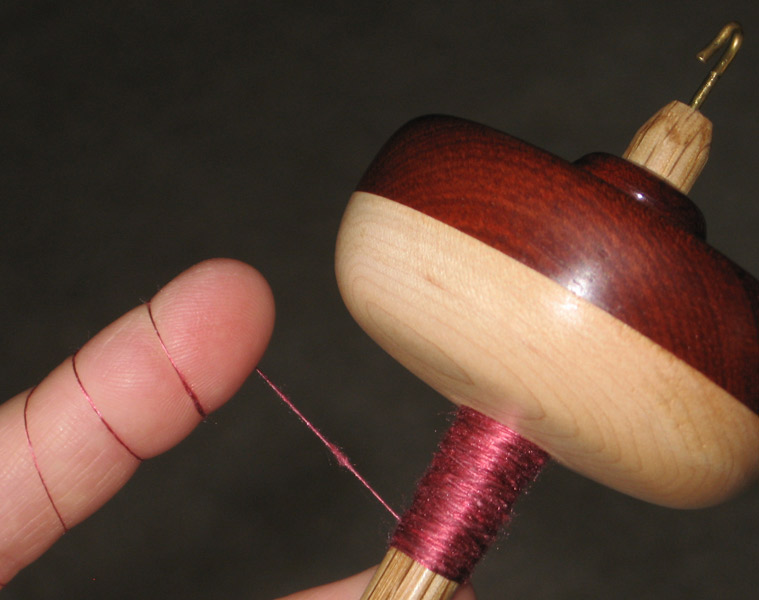
This photo (left) is just a reminder that one should always lubricate the wheel before sitting down to spin. ;-)
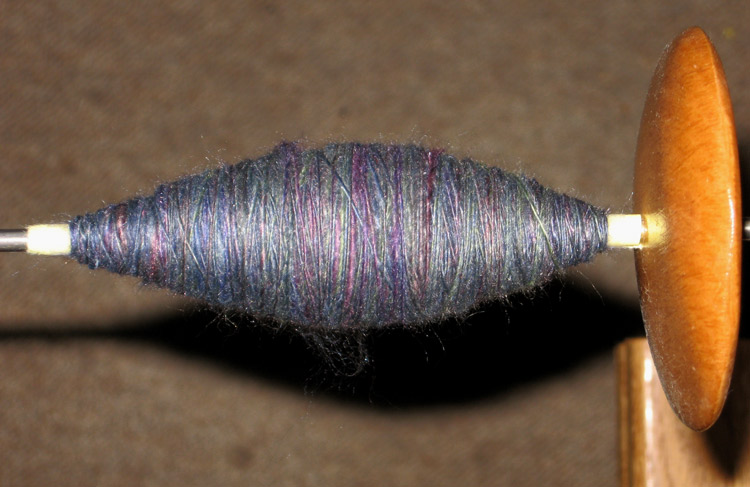
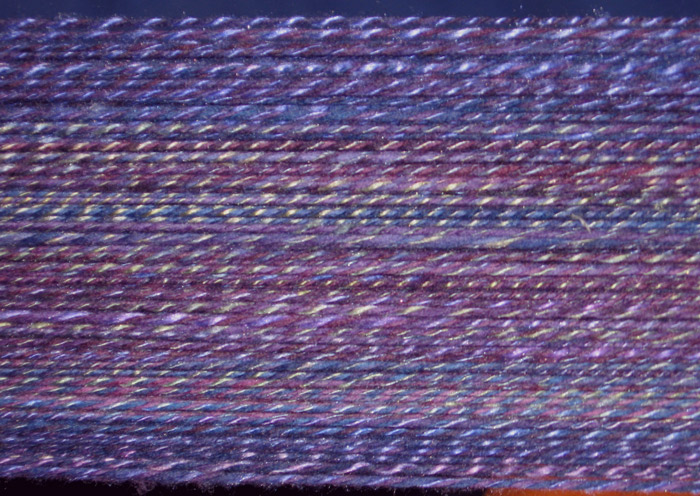
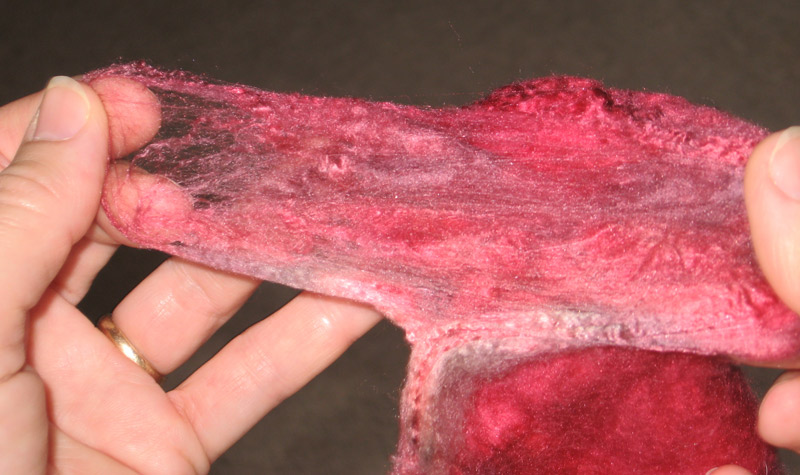
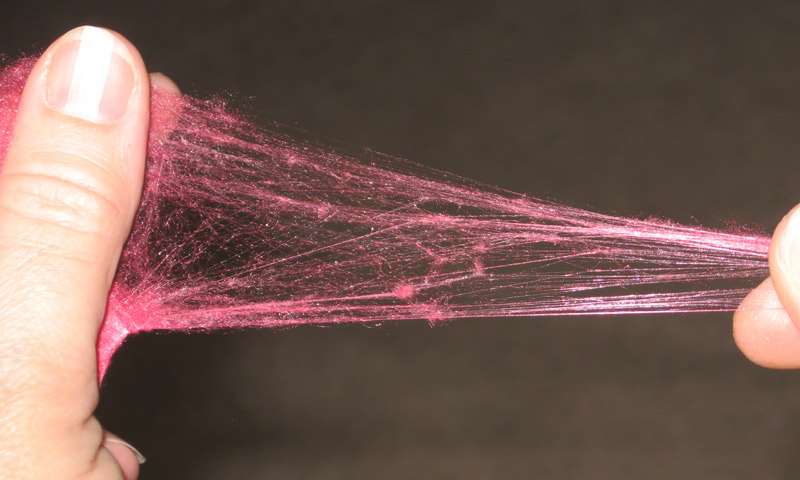
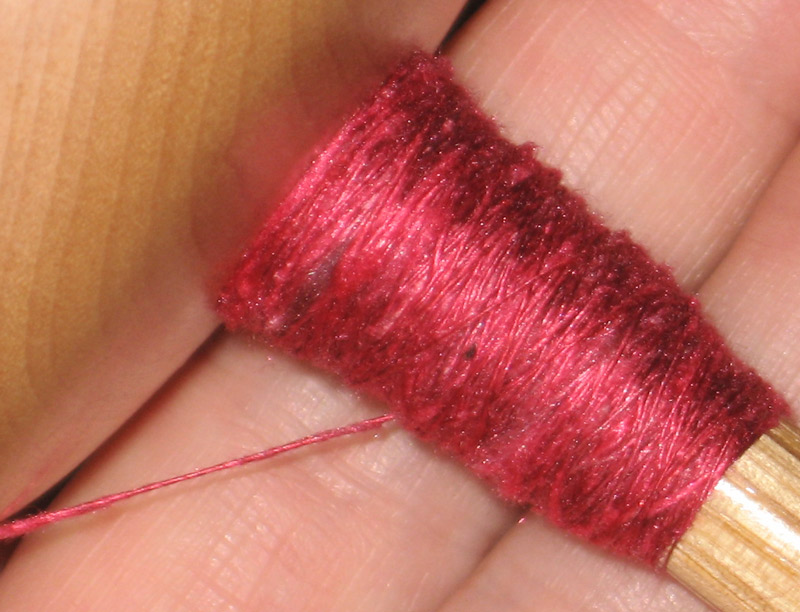
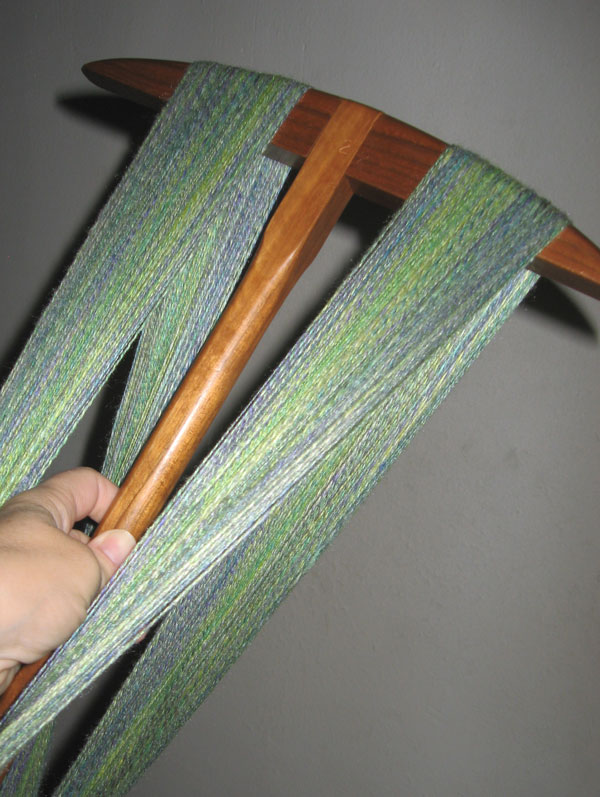
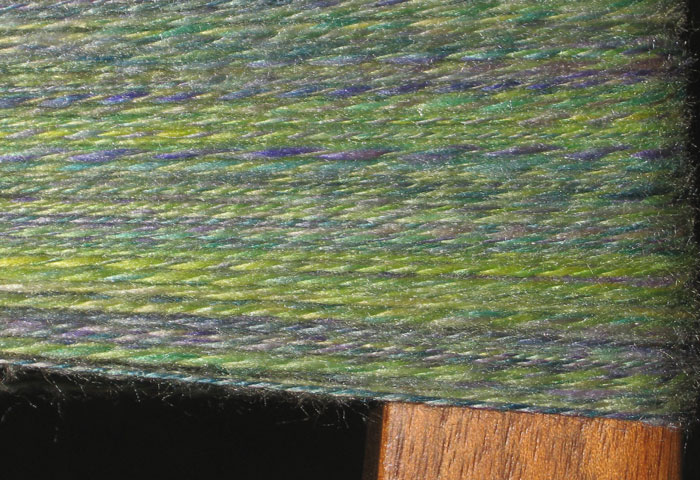
The picture of the 3-ply yarn (above right) shows it as it looked while still on the skeinwinder. Since then, it's been washed -- and as promised, the irregularities have puffed up and made themselves visible. But it's still good. A touch of silk gleams through the puffy softness at regular intervals, and the eye dances happily over the array of colour.
This skein contains about 300 yards of yarn, which should be plenty for the scarf I have in mind. It will be a simple twill, with this amazingly soft yarn as its weft, and a warp of worsted-spun black alpaca.
I'm warping this afternoon. Even as winter falls down on us, there's hope!
End notes, for inquiring minds
♦ The beautiful space-dyed silk brick came from Oliver Twists in northern England. Look for their stand at major spinning and weaving shows in the UK and northern Europe.
♦ My friend purchased the merino wool from a long-forgotten source but thinks it came from the Southern Hemisphere. The wool singles is shown on the bobbin of the first wheel I ever bought: a Louet S70. This wheel is still in frequent use. Click here to read more.
♦ The spindle wheel in these photos is one I built several years ago, and it's one of the best in my collection for smooth silk spinning. Click here to read about it.
15 October 2009

A few short months ago, I strayed from the usual path to talk about personal things. It's happening again: today I want to talk about my father.
He's probably the most amazing man I've ever known. A vigourous 93-year-old with a curious mind, he'd planned to spend the month of October roaming the French countryside, studying the language and exploring the wines. His plans stretched far into 2010, with season tickets to a concert series and a scheduled summer kayak trip.
Unhappily, all plans were thwarted when he had a swift and massive cerebral hemorrhage early last month. I was in Holland when the call came to rejoin the family immediately -- which I did without hesitation, but my trip took two days. By the time I arrived, he had closed his eyes. He was still "there", aware of my arrival and the presence of all three of us "kids", communicating by squeezing our hands -- but it was clear there would be no recovery.
It was quiet at the Hospice House, and calm, with an enclosed garden for peaceful meditation and beautiful photographs on the walls. Dad was comfortable. All three of his kids were there with him, around the clock. Day by day he withdrew from us, and after about a week, he slipped away -- calmly, peacefully, his passing synchronized with the new moon.
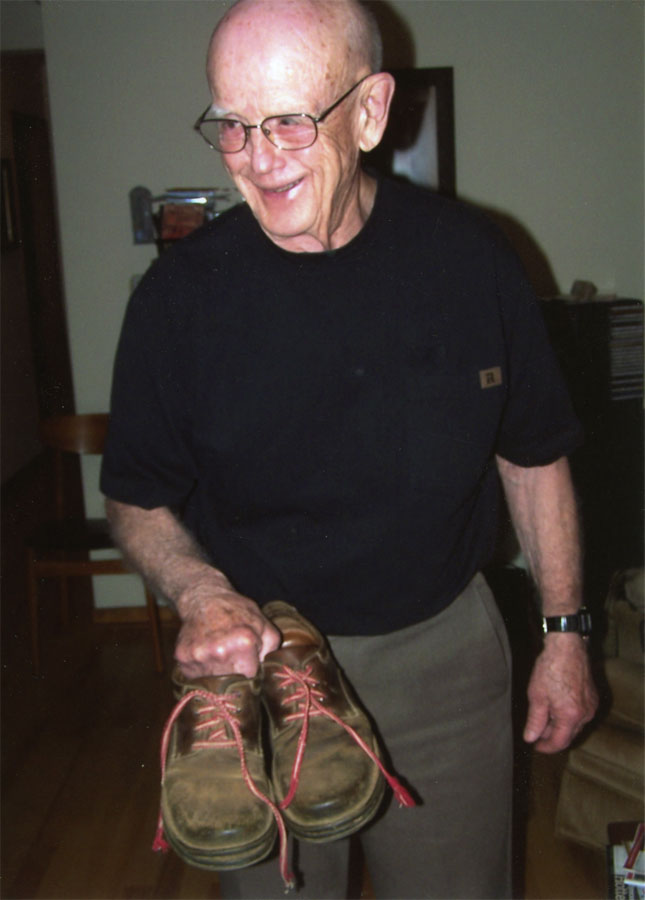
Dad was a research chemist all his working life, and in retirement he was a backpacker, a dancer, a canoeist and kayaker, a mountain climber, and an Elderhosteler, eagerly seeking new knowledge in all settings. He was also a new weaver. He got interested in working with threads a few years back, when Mom's age-related challenges first started limiting their activities. He wanted to create things in a way that would keep his mind busy, could be interrupted mid-activity, and resulted in something useful -- and beautiful.
He started with kumihimo and embraced it with pleasure, making his own maru dai and filling a shoebox with lovely braids. As he went along, his experiments with colour got more and more adventurous -- he'd never worked with colour before, so it was a brand new world for him.
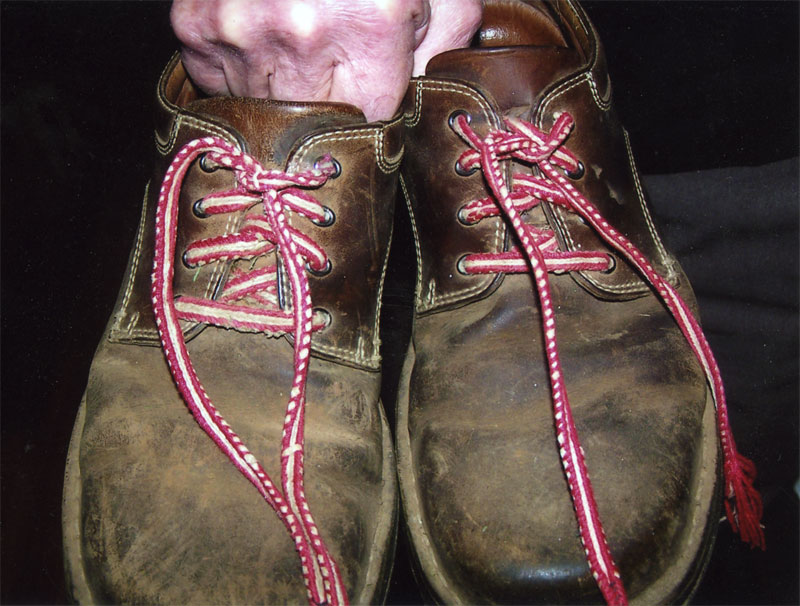
When the shoelaces on his work boots wore out, he asked about tablet weaving -- and his first weaving project was a pair of long laces made of handspun linen and a durable-looking red yarn from Mom's yarn stash. The laces (shown here after two years of wear) outlasted the boots.
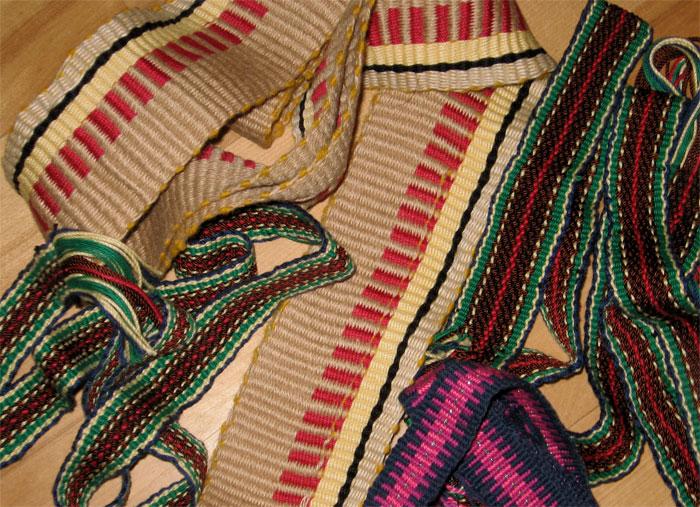
He liked the bootlace project, but wanted something easier to set up than tablet weaving -- something he could move from room to room and not puzzle over later if he were interrupted. With that in mind, we spent a Christmas vacation building a matched pair of inkle looms, and the months afterward saw a flow of wonderful, colourful bands, each more interesting than the last. He absolutely loved it. When I started making semi-rigid heddles the year after that, he tested my prototype and declared it "as pleasant as inkle weaving, or maybe better, because the threads never fall off the ends of the pegs". ;-)
This past spring we travelled together to Spokane for the ANWG conference, where he toured the vendors' hall with curiosity and interest. A short time later we journeyed to northern Idaho to visit landscapes from his childhood. Weaving was just one of many things we had in common, and we had plans.
I have lost my best accomplice.
16 August 2009
It's the heat. It goes to my head, makes my fingers fumbly and shorts out my circuits. It derails plans. You never know what might happen when the weather turns hot.
And so it is that I find myself spinning silk noil (left).
Silk noil is really, truly silk, but it's a "sow's ear" kind of silk. It's neppy, often snarly, low in sheen and high in texture (click on the small image for a closer view). It's lured many spinners into buying it because of its low price -- and it's often been cursed. Soundly. Most baggies of noils, after one session with a spinner, are relegated to the very bottom of the stash basket.
Myself, I have a love-hate relationship with silk noil. I love the texture. I love the lightness. But I usually don't feel like spinning it with the kind of focus it wants -- and I've found only a few fibres that blend with it gracefully.
That brings us to this week's heat wave. As I unsuspectingly went about my business, I peeked into an unlabeled box and found a full kilo (oh dear) of carded silk noil. And, heaven help me, I decided it was time to use it.
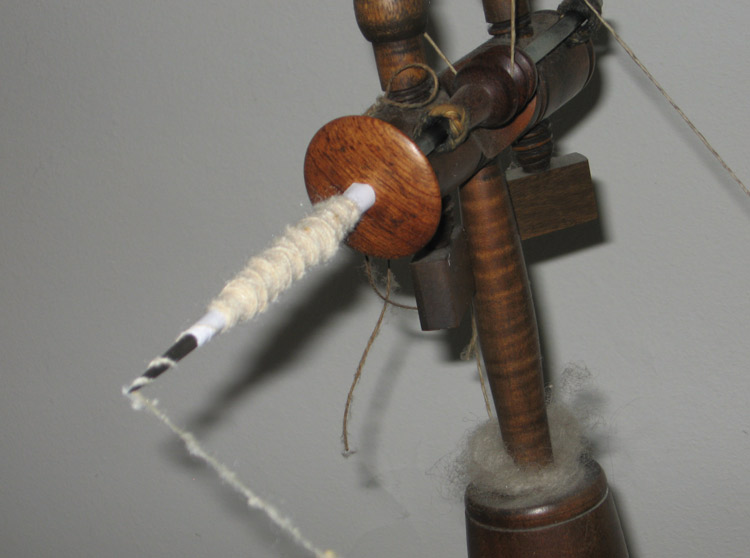
This time would be different from times past, though. This time I would be smart. In short, this time I decided to spin noil on the great wheel (right). And to cut straight to the surprising conclusion: I'm actually enjoying myself. Neps and all.
Most spinners will recognize that the "great wheel" photo doesn't actually show the wheel itself, but only the spinning head. ;-) It also shows the characteristic that sets spindle wheel spinning apart from spinning on other kinds of wheels: the yarn spirals out to the point of the spindle, then jumps off; and each time it jumps off, it adds a twist to the yarn-in-progress. The wheel itself puts no strain on the yarn. It just provides Twist.
This "quirk" of spindle wheels is one of their great strengths -- a strength you can put to use when spinning short fibres, or "difficult" ones. On the great wheel (also the charkha, the Navajo spindle, the takli and other supported spindles), you use twist "stored" in the yarn to pull the fibres from the fibre mass (left). In other words, the twist itself does the drafting, and you turn the wheel to provide only enough twist to let you draft out an underspun length of yarn.
 ...It sounds strange, but it's just a different mind-set. You let the twist do the drafting for you. Period.
Once you've drafted out a dangerous length of underspun yarn, you stop drafting, pinch at the junction between Yarn and Fibre, and simply add twist until the yarn has smoothed and firmed up (right). It's magical. It feels like it stretches and sleeks itself up, right before your eyes. If you try it, you'll be hooked -- guaranteed.
Fibre nerds will want to note that this is very nearly a description of long-draw drafting. ;-) There's one important difference, though: in longdraw, the drafting zone spreads over the entire length of the draw -- whereas here, the drafting zone is confined to the area where the twist meets the fibre. Mabel Ross called this form of drafting "point-of-contact" drafting. It's a good term.
This noil-spinning roll started about a week ago, and it's been occupying all my stolen moments. On the great wheel, I spin onto quills -- and the cops are piling up (left). :-)
It still surprises me that I'm doing this. It's pleasant enough -- this particular batch of carded noil has enough "regular" silk fibre in it to make it feel like spinning (some batches of noil feel like paper maché and give you the impression you're working with spitwads).
Tactile pleasure is usually enough of a reason for doing anything -- but here there's an even better one (right). Pair up one ply of this textured, nearly-matte noil yarn and another ply of shimmery tussah, and you've got something very, very pretty. (Click on the thumbnail for a better view -- the small image doesn't do it justice.)

Like most of us, I have a good-sized collection of "experimental" skeins. This yarn, though, is more than the average fun-for-a-day trial. Knitted into a swatch, it's airy, heart-meltingly supple, and more sensuous than you'd normally expect a textured yarn to be (left). ...If I knew how to upload the feel of this swatch, I'd do it! You can get a larger-than-life view by clicking here (please be generous with the flaws in my knitting!).
The swatch is so wonderful in the hand that I'm eager to see how the yarn behaves when woven. I'm envisioning lovely scarves (yes, plural) -- because I think it's going to be good!
29 July 2009
Today's tale is one of unpacking, meditation and memory. It features some beautifully Red silk hankies, a spindle, and a snapshot memory from years ago....
Before we start the tale, here's the background. Many, many years ago a quilt in an historical exhibit completely caught my imagination. It was a "mourning" quilt, made of tiny bits of cloth cut to about 1cm square, all pieced by hand. Its finished size was large enough to cover a double bed -- hanging to the floor on both sides and one end. Its tiny stitches still haunt me.
Besides being an incredible, beautiful work, it struck me as an excellent way to grieve: extremely fine work to keep the "chatty" part of the mind occupied, but which wouldn't be damaged when thoughts inevitably drifted off-track.
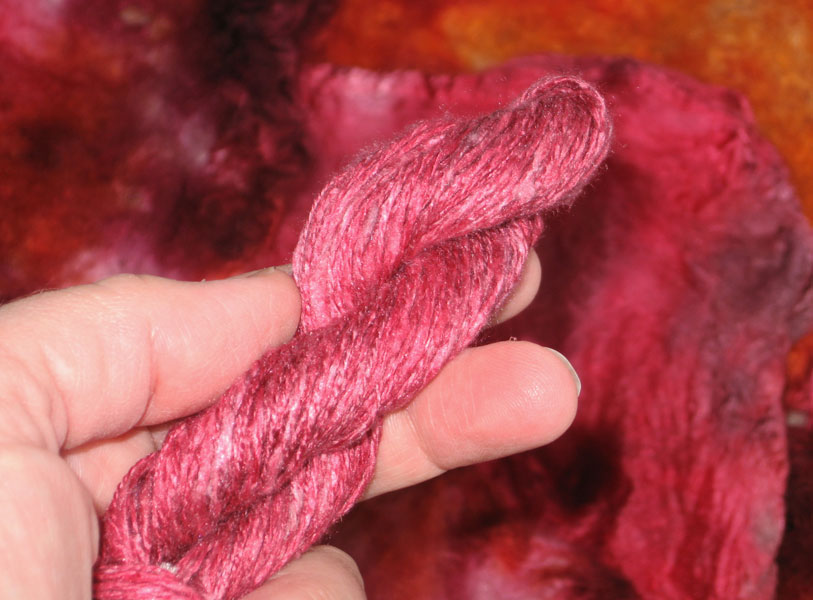
That quilt came to mind when I unpacked another suitcase and freed these beautiful dyed silk hankies from their confinement (above left). These hankies followed me home from the ANWG conference in Spokane, for reasons you'll understand if you love Red. I immediately spun and plied a sample (right), using the fast-and-greedy technique -- then decided to stop, calm myself, and set about it again with a fresh spindle and a more thoughtful approach.
Because I get questions about hankies from time to time, let me share today's process with you. It takes place on a spindle, but the same principles apply when you're spinning with a wheel. :-)

Silk hankies are "stretched-cocoon" preparations. They're created when degummed cocoons are pulled, one by one, from their degumming bath, are opened up and stretched into a fine, webby sheet, then are placed in layers on a square frame to be held while drying. Each hankie you get from your fibre supplier has several cocoon-layers in it -- as you can see when you look at the hankie's edge (left).
There are many ways to spin hankies -- and many kinds of yarn to create from them. You can open them out into a pre-drafted "roving". You can roll them like a jelly-roll and cut them in slices, then spin the slices. You can spin a durable, low-twist, thick yarn, or a high-sheen super-fine one. ...That's just so you know that what comes next isn't the only way to handle hankies. ;-)
The first order of business: peel off one of the lovely fine layers. To do this, catch one layer at the corner and pull it away from the others. Take the fine layer in one hand and the rest of the hankie in the other and pull them completely apart. It's not a totally tidy project (I'm being truthful here!), and it looks like this:

There's a missing photo in that sequence, so you'll have to imagine the one that should be just after Photo Two: it's the part where my arms are stretched out wide to get the last of the fibres from the two hankie parts to let go (too wide for my camera lens!). ...You can see the fine layer in the rightmost photo, though, hanging free (click on it for a closer view). The hankie layers are really quite beautiful when separated like this: lacey and translucent, a shimmer of light and shadow, weightless.
Once you have the hankie layer free, you can start spinning it. I'm using a top-whorl spindle in these pictures, and it has a hook -- which makes it very easy to get started: you simply catch the hook in the corner of the hankie layer and add twist!
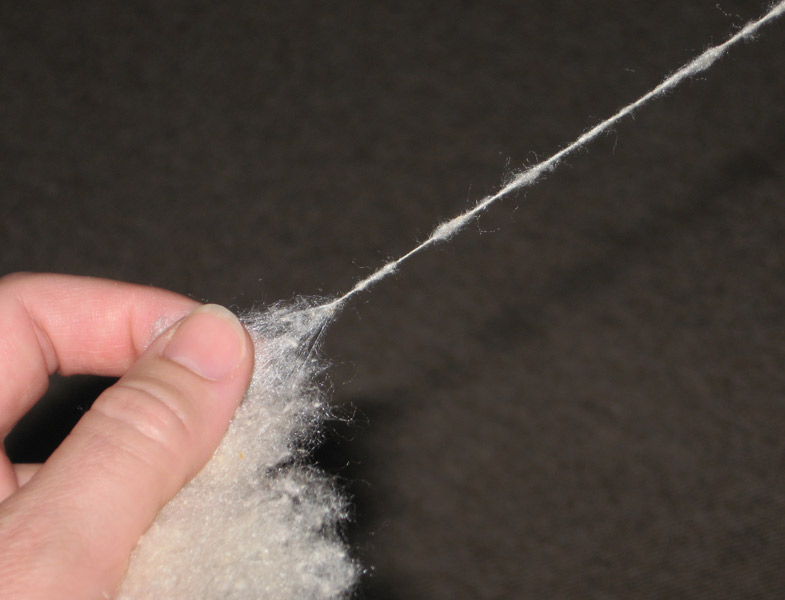
The secret to happiness in spinning hankies is to realize the fibres are very long. With that understanding, you'll know to give this silk a generous drafting zone (left). Use one hand to make sure the hankie layer is held "wide", so its fibres form a nice, big fan-end for the drafting triangle, and use the other hand to pull just the amount of silk fibre you want out toward the twist.
My personal quirk is that I usually draft hankies horizontally, even when using a spindle -- just because I find it more comfortable to allow a big drafting zone when I'm working "sideways". Classic (vertical) drop-spinning works too, though (right). Do whatever feels most comfortable for you! :-)
With the process started and rolling, the next step is to decide what kind of yarn to spin -- and this is where my old story about the mourning quilt comes into the picture. My fast-and-greedy sample was fun, but it wasn't the kind of yarn that satisfied the whatever-it-is that made me reach for this silk in the first place. I wanted to work on something fine and beautiful, that would keep the "chatty" part of my mind occupied so other thoughts could rise unbidden to the surface.
It's amazingly simple to control the fineness of a yarn while spinning hankies. Their natural resistance to drafting makes them ideal for careful control: you simply limit the amount of fibre available in the drafting zone (left). It doesn't seem that it should be that easy, but it is.
Hold the drafting triangle wide as you set the spindle in motion. Draft. Slide your drafting hand gently toward the fibre source. The spindle descends. Draft. Slide your drafting hand toward the source. The spindle descends. It's lovely, simple, rhythmic, smooth.
As spinning continues, the mind calms. Memories drift up to the surface like curious fish, take a look, then slide gently back into the depths. Draft, slide, descend. Draft, slide, descend. It's a wonderful thing. It's a kind of cheater's meditation -- you get the benefit of meditation without having to learn exactly how to do it. No studies, no mantra -- just draft, slide, descend.
The fine drafting zone pictured above yields a very satisfying yarn (right).
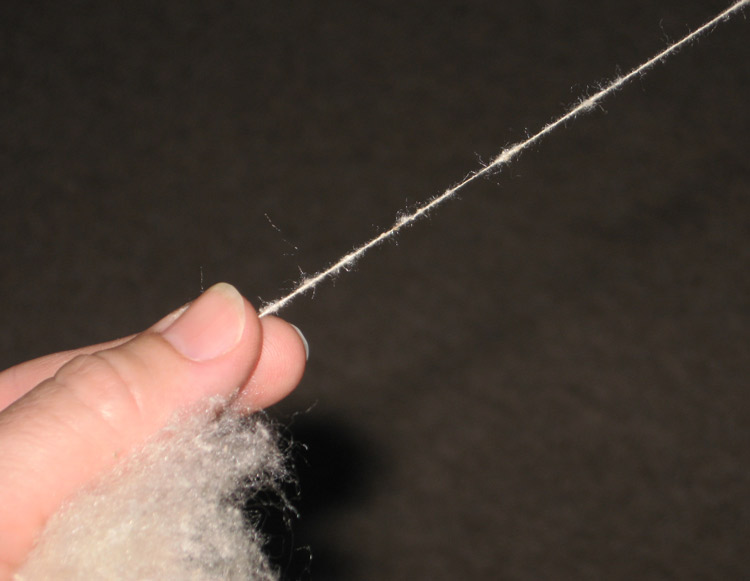
There's just one more thing to mention here about hankies, of special interest to people who worry a great deal as they spin: hankies have neps (clearly visible in the drafting zone at left).
Think about it, and you'll understand why. Hankies are cocoons that have been stretched out to a square shape. Their fibres haven't been cut, nor have they been combed. The chrysalis is usually all gone, leaving no insect-y evidence behind; but most of the little short bits that came at the end of the silkworm's spinning process are still there.
Neps are natural. Some people are bothered by them, though, and will carefully pick them out of the fibre so they won't have them in the yarn. ...And there's nothing wrong with that! I didn't do it today, because I find them interesting -- and also, picking them out would have interfered with that lovely process of draft, slide, descend.
Here's how the yarn looks, closer than the naked eye can see, neps included (right). Click on it for a larger-than-life view.
The neps are part of the whole thing for me, in my meditative, slightly distracted state. They're part of the fibre, and part of the yarn. They demand a little more attention than other parts of the fibre, but they still have value.
Today that seems to be a nice metaphor for life: even when it's full of bumps and irregularities, it can be very beautiful. Lumps, neps, warts and all -- every bit of that beauty is worth it.
End notes, for inquiring minds
♦ The lovely dyed silk hankies came from RedFish DyeWorks (click here for their website). Look for their stand at major spinning and weaving shows in North America.
♦ The spindle in these photos was made several years ago by Jim of Spinner's Choice in Newberg, Oregon -- click here to see his current stock.
25 July 2009
A few weeks ago, while preparing for my return home, I was dismayed to find several jars of dye solution still on the shelf awaiting their destiny. I don't like pouring nearly-full containers of dye down the drain -- not so much for ecological reasons (this stuff is pretty benign!), more because I dislike waste. ...But I was leaving, so the dyes had to go.
Luckily a friend had sent me a few bricks of tussah silk from her stash. (I have super friends!)
I took a brick and dyed it. (Click on the photo for full effect.)
Space-dyeing is a nice process because you can free yourself from rules and expectations -- and end up with great surprises. The dye colours used on this brick were Violet, Turquoise, and Yellow; but where the dyes interact you get the clear impression that many other colours participated, too! In some zones the dye did not penetrate clear through -- which pleases me because I'd actually wanted that, figuring it would give extra luminosity to the final yarn by making some areas take on a hazy pastel shimmer.
I've been starving for my wheels these past months, so this multi-hued silk came out of the bag as soon as jet lag would allow. I began by spinning a medium-fine yarn but quickly switched to spinning finer -- this particular batch of silk has a pronounced sparkle, and it was just gorgeous in a fine, higher-twist yarn!
The photos don't do it justice, probably because the camera's flash can capture sheen but not sparkle. But you can imagine the parts the picture can't convey: the airy weight of the yarn, its suppleness, its caress-like touch, its sparkly calm. The often-vivid colours of the original fibre blend without muddying, and that pastel haze I'd hoped for spreads a gentle sheen over the entire skein.
Bombyx bricks (a.k.a. "mulberry" bricks) are usually smooth and uniform, but most tussah bricks have surprises in them: little neps, occasional bits of debris, small areas that are denser than others.... The number of surprises varies a lot from brick to brick -- and it's something I like a lot. The variations keep me on my toes. :-)
This particular brick didn't contain any debris, but there were a few neps and dense spots. They weren't at all visible in the fibre when I unfolded and examined it -- but they were there! Instead of picking them out as I spun, I incorporated them in the yarn. Their gentle irregularities give an extra liveliness to the skeined yarn, and when the yarn gets woven, that liveliness will run through the cloth, too. (I love this stuff!)
In the past my visions of pretty fibre turning into muddy yarn have kept me from doing much space-dyeing -- but this brick may change my attitude! :-)
20 July 2009
Helpful Travel Hints
The languid days of summer stir up dreams of travel, and our friends who run the airlines have been busy tightening luggage restrictions. Most of the "lug" has been taken out of "luggage" -- which means the end of happy-go-lucky packing. Even the most streamlined handspinner now needs to plan (carefully!) what to pack and what to leave behind.
One of the tools I've never been able to take on travels is my swift. I love my swift. When I don't have my swift, I miss it. Winding a ball of yarn from a skein draped over a knee (or over a chair, or stretched between the feet) just isn't satisfying.
If you have known the heartbreak of swiftlessness, you know exactly what I'm talking about.
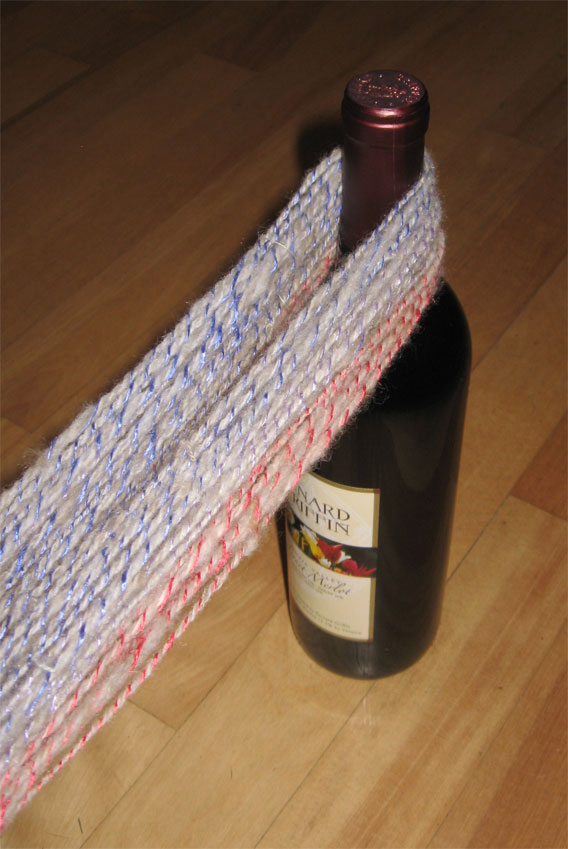
And you'll love this: a swift you can set up anywhere.
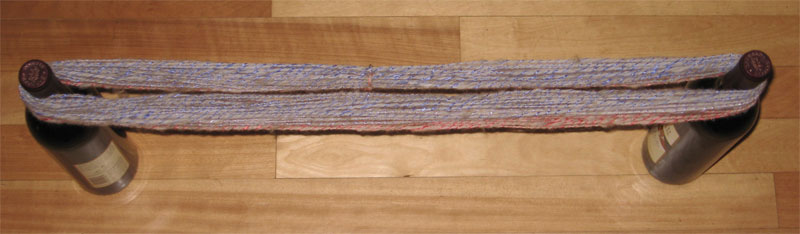
Wherever you are, you can find the raw materials to do this -- and it works beautifully! The days of swiftless tangling are over, and we can now wind balls of yarn far from home. Without cursing.
The only hitch: you can't drink the wine until after you've finished winding, because the setup is a lot more stable while the bottles are full. (I experimented with this and know it to be true. Oh, the things we'll do in the course of research!)
So wind away.
And cheers! ;-)
29 June 2009
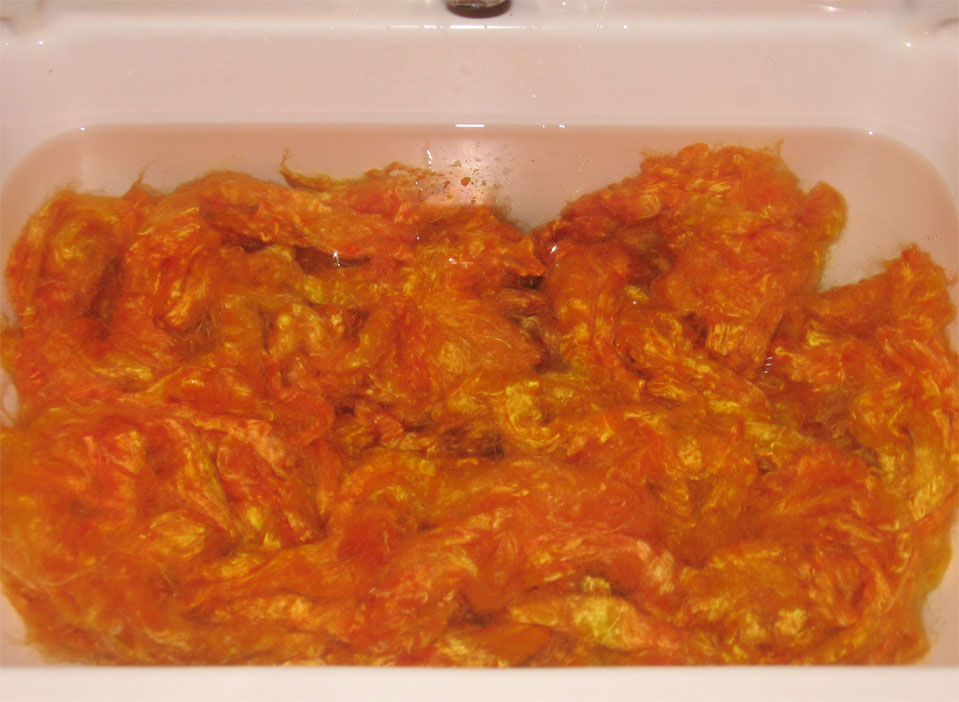
In case we needed proof that I've been distracted, here's a confession: I wrote up an update (below) a little while back, but forgot to put it online. Sheesh!
Here's another bit of proof (left). This was going to be a nice batch of "Marigold" silk, but my attention strayed as I was adding yellow dye to the bath. The result: a bath with almost twice the usual amount of yellow, and an incredibly vibrant result! The photo was taken as the silk soaked in its rinse bath (I couldn't wait to take the picture). Click on the small image to get the full effect.
As mistakes go, it's a nice one. It's positively solar. :-)
Stay tuned for more later. There have been interesting developments with that Seacell fibre.
Postscript: A longtime friend e-mailed me about the vibrantly coloured photo above and said that no matter how hard she tried to see it as silk in the sink, all she could see was a mass of Cheetos! (Alas, now that's all I can see, too!)
05 June 2009

We have survived the ANWG conference in Spokane, Washington, and I've come away with lots of images, ideas, and new friends.

The friend in the photo at left, basking comfortably on the banks of the Spokane River, is a young marmot. His mother (right) kept a careful eye on him and though she finally decided I wasn't a threat, she stayed within earshot -- close enough to intervene if needed.
By the river the breeze was light and enchanting, but inside the ANWG Vendor Hall, we sweltered. True, we sweltered happily -- but it was astonishingly hot. Silk fibres glued themselves to sticky hands. Conversations drifted away mid-sentence, to be taken up again only after a deep breath and a daubing handkerchief. It was, in fact, much too hot for many of the conference attendees, who gave up after penetrating only a few yards into the building. Just Plain Hot.
The heat wasn't the only feature, of course. There was a fabulous fashion show (there's a lot of talent in the Northwest corner of this continent!), inspiring exchanges, incredible colours and textures.... In short, everything one might want. I think everyone came away from the conference full of fresh ideas and with hands itching to get to work.
On the way home afterwards, I stopped in at Paradise Fibers, a local business I'd already "met" in online browsings. I expected a pleasant little shop. Instead, I found an amazing, expansive business, easily ten times the size I'd imagined! There was an enormous room filled with yarns and knitting/crochet supplies -- then another huge room filled with fibres and spinning equipment, with generous space for classes and spin-ins on one end... and that wasn't all! Beyond the fascinating labyrinths of fibre (I could have spent all day in there) lay more wonders: the weaving room, filled with looms large and small, a wall full of coned yarn, and every accessory and tool imaginable. It was wonderful.
In the Fibre room I encountered an interesting material called "Seacell", a Tencel-like regenerated fibre with the colour of natural Tussah silk and seaweed as one of its prime ingredients. It's pretty. You'll hear more about this later, because some of it followed me home.
Did I mention it was hot in Spokane? ;-)
05 May 2009
I've often said this website is not about me, and that's absolutely true. Sometimes, though, the personal realm requires all the focus you can devote to it -- and that's been the case these past few months. Several of you have wondered at my prolonged silence, and I thank you for your concern. ...Recent events are likely to colour my activities for some time to come, so even though we'll be back to normal very soon, just for today I'm going to talk about me.
In mid-February my mother had a massive heart attack. She was hospitalized for ten exhausting days (hospitals are not restful places), then came home to see if familiar, calm surroundings could do her more good than the dizzying stream of nurses, technicians and doctors had done. They could, and did. She gradually got more comfortable, more rested, stronger, more clear-minded. All the same, it was soon clear that recovery was unlikely.
We started "home hospice" in mid-March. Mom had good days and slow days mixed, and our worlds revolved around her -- day and night. There were some wonderful times in there -- days when she would be clear-minded, active, interested, engaged... and cracking the best jokes I've ever heard her make! She became a little nocturnal, too, not through discomfort or agitation, but just because after night fell she was completely awake. We had some wonderful conversations in semi-darkness -- she would reminisce, or talk about things she'd been envisioning, or ask about people she'd known -- talking either to me (exhausted) or Dad (exhausted) in the wee hours of night. Wonderful conversations.
On April 7th she had another cardiac event and the hospice nurse (worth her weight in gold) adjusted the medications to help her breathe comfortably. Mom was calm, aware and surrounded by people who love her. In the afternoon of April 8th she died -- calmly, consciously, comfortably, holding our hands. She was three days short of her 90th birthday.
So... I am still here at my parents' house on my "Christmas" visit, and Dad and I are both grateful to have turned all the calendars to the month of May (April was exceedingly long).
The spinning, weaving and dyeing have started again, and you'll be hearing about them soon. The good things you've heard about fibre work as therapy are true -- it helps, all of it: twist entering fibres soothes and mesmerizes; the orderliness of warp threads crossed by weft calms, and the growth of woven pattern is reassuring; the pure, steaming colours of the dyepot surprise the eye with unexpected pleasure.
And as we become more aware of daily rhythms, plans are afoot... including the ANWG conference in Spokane at the end of May (it's the regional conference of Northwest spinning and weaving guilds -- click here to learn more).
The emotional work isn't all done yet, but that's not surprising. It's a long haul. Already memories of totally-forgotten times and events are surfacing, often at the most unexpected moments. Some will probably show up here. We'll all just have to wait and see.
All I can say for sure is this: love is the only thing that matters.
13 February 2009
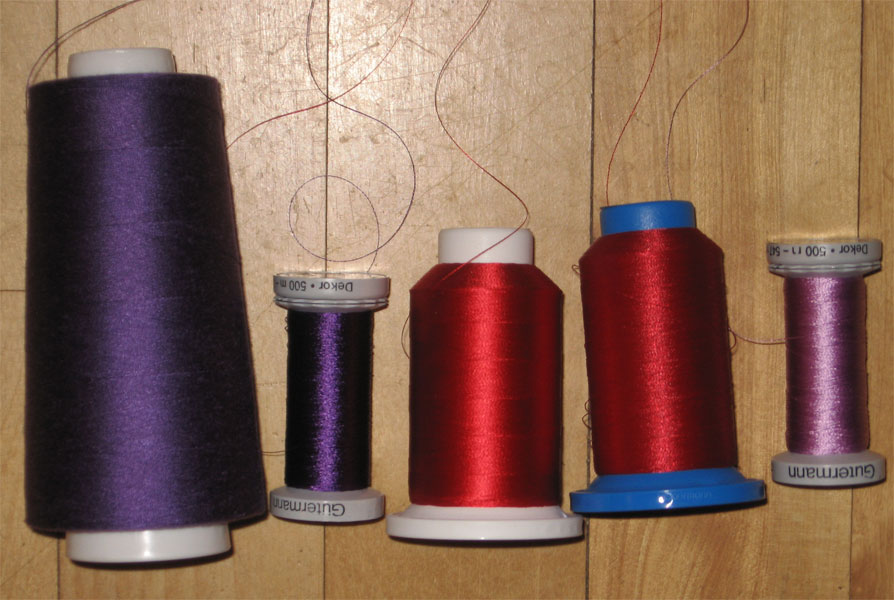
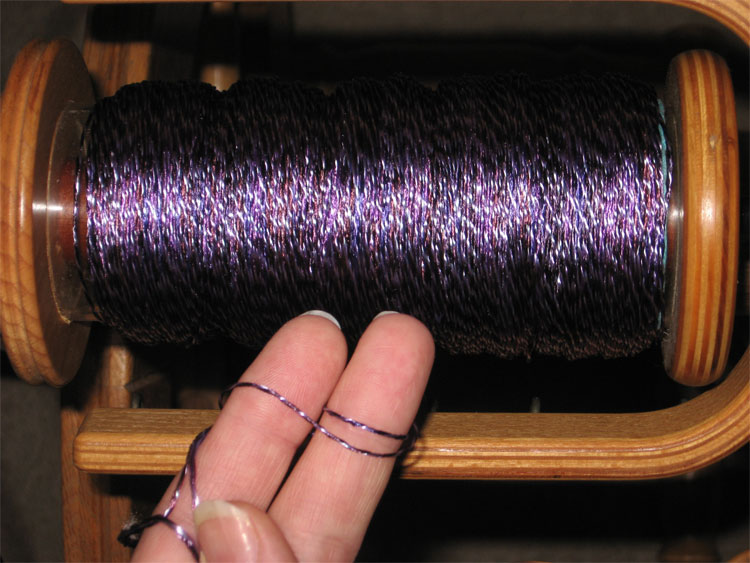
Two things coincided this week. First, I desperately needed some high-sheen, super-supple, deliciously slinky threads to use in tassels. Second, I spent a couple of days sitting with a family member in a hospital.
In a situation like that, what choice is there?? I selected a nice array of sewing threads (left), tucked a longer-shafted, heavy-ish spindle into my bag -- and all needs were met.

The biggest problem, in fact, was how to keep the fine threads tidy and unsnarled -- a problem neatly solved by one of those wonderful zip-top bags (right). I'd worried that the spools would jump around inside the bag, and that threads would catch on snaggy parts of the zipper top; but my fears were unfounded. Or maybe because I was worried, I paid better attention. (Whatever.) With the baggie sitting on the floor, it was easy to pull a length of threads from the bag, put the spindle in motion (Z), and watch the twist climb upward, tightening the spiralled stripes of colour, transforming thread into yarn.
It was lovely to ply bright sewing threads into a new, totally unbalanced yarn (left -- click on the photo for a closer view). This was the first ply, the first colour test. The yarn was sleek and pleasing, and I loved the way the reds and purples blended together to give impressions of light and shadow. (I don't know if that shows clearly in the photo, but it was a pure delight -- just what one needs while waiting in a hospital!)
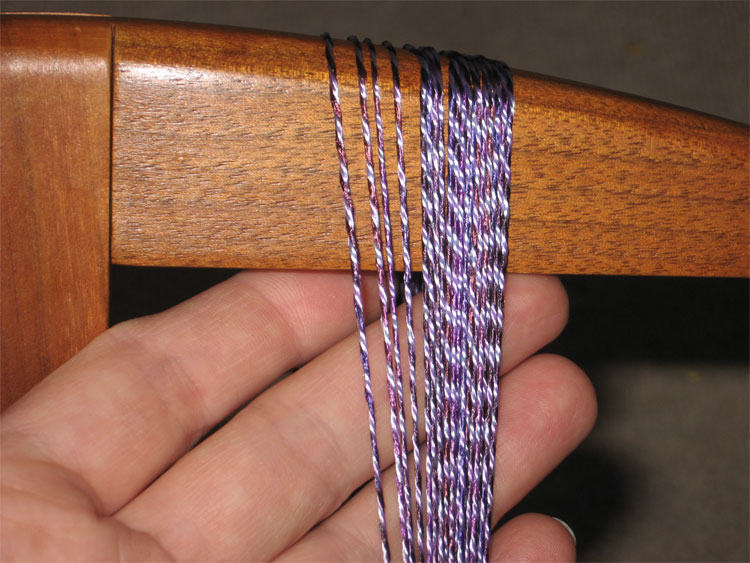
This first-ply yarn was unstable -- meaning it rapidly untwisted as soon as it tasted liberty from the spindle. That was all right, because I'd planned to re-ply it anyway; but it was so eager to untwist that I needed to tape the first end to my wrist in order to wind a plying structure around my hand. I used a plying technique I think I've mentioned here before, a variation on "Andean" plying which doesn't involve wrapping the finger,
 and which gives very positive control over the yarn in your hand. Firm control was essential -- the first-ply yarn had a pronounced wish to snarl. And that's snarl, with vim and vigour! (Good thing these were all slippery threads, or their snarliness would have tried my vocabulary!)
Plied again (S), the yarn became smooth, sleek, well-behaved, and wonderfully fluid (right). The colours blended even more beautifully than I'd hoped -- even the lightness of the pale lilac settled down as a gleam in the mix. I like it. :-)
So that takes care of one day of coinciding needs. I'm sure more of them lie just ahead....
10 February 2009
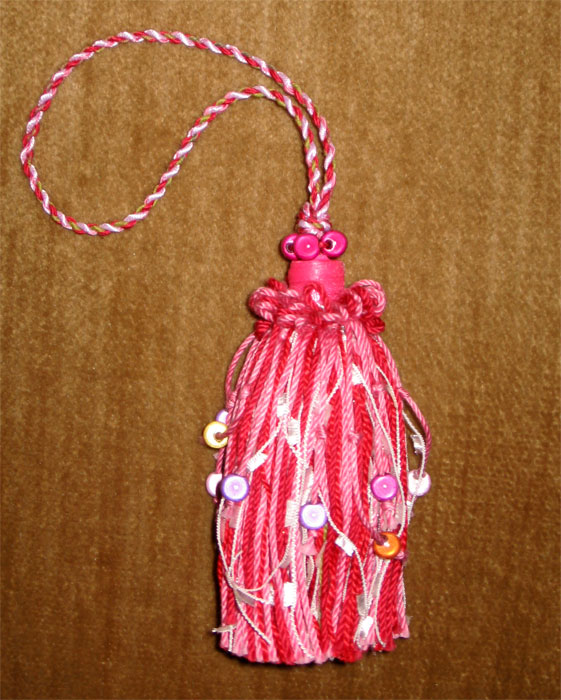
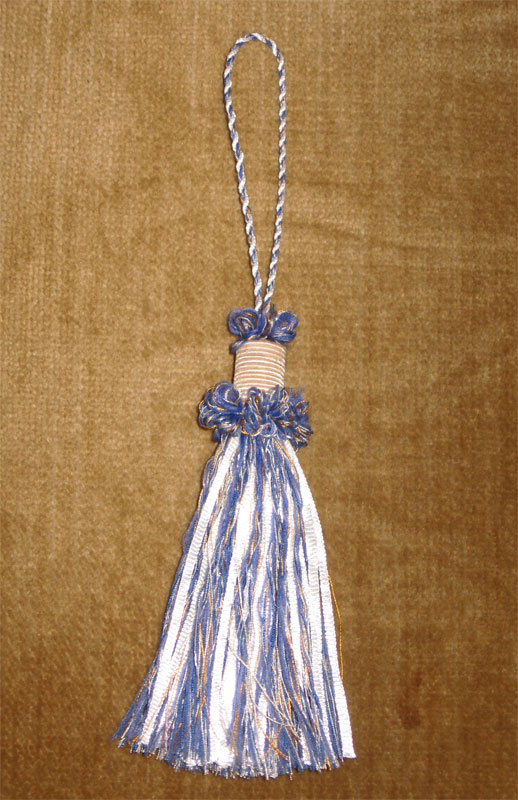
Amazing but true: we find ourselves less than a week from Valentine's Day. Influenced by all the hearts and lace all around, I decided to create a Valentine's tassel. The result (left) is almost what I had in mind. (Click the photo for a larger view.)
For those interested in tassel anatomy, the thing was created in several stages. First, the tassel mould (a rescued plastic cap, as before) was wrapped with vividly pink satin ribbon. Next, having chosen the yarns for the tassel skirts, I used them to twist a hanging cord that would blend with the colour scheme. Third, I made a soft-headed tassel in mainly cotton yarns (red and pink cottons, plus a wispy textured white), mounted it on the cord, and pulled it into the tassel head and through the top.
So much for basic structure. :-) I wanted a nice, full tassel skirt, so I wound an "overskirt" in those same yarns, twining wire between each wrap. The ruff, which would bring the parts together visually, would be red and pink cottons -- but I thought it would be nice to add dangling beads, too, so I twisted strands of beaded cotton in with the looped yarns as I made the ruff. Finally, I added a little crown of beads and knotted the cord above it. And there it was.
It is a learning tassel and had a few aspects I wanted to change right away. First, my mind's eye thought beads dangling at random heights would look nice -- but in fact they just look like mistakes. :-/ Second, the lacily textured white yarn turned out to have a mind of its own, and after minor handling refused to hang nicely along with the other yarns. Third, a few beads of unintended colours sneaked into the mix (honest, they'd looked pink and red by the living room light!).
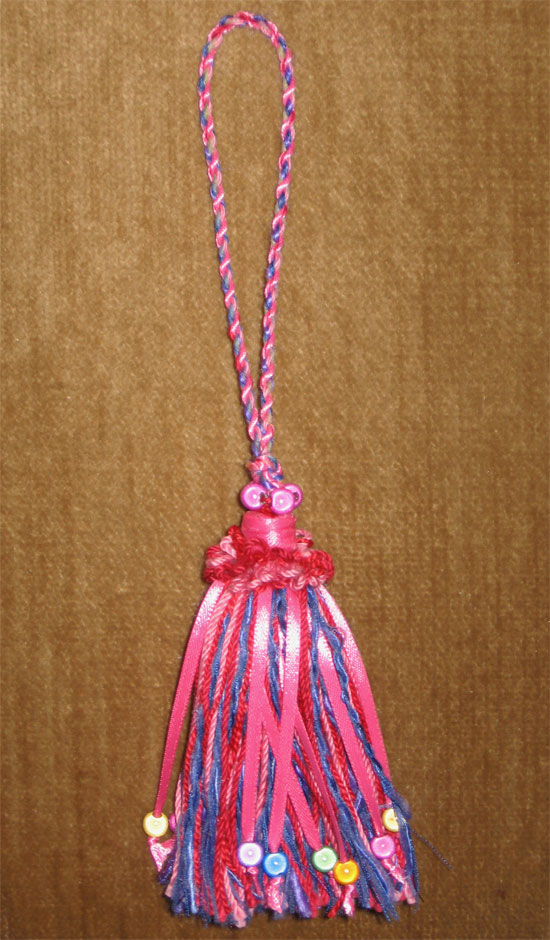
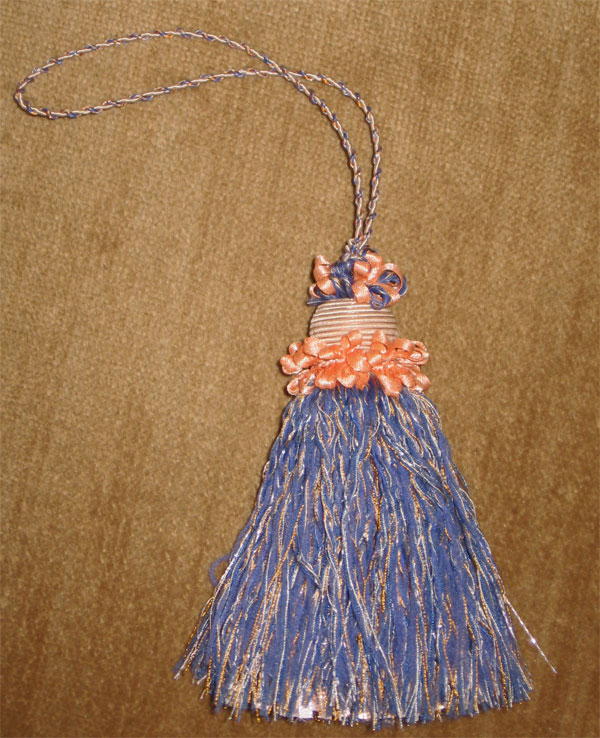
The real clincher, though, is that my husband-valentine does not see reds and pinks as well as I do -- so this really isn't the proper missive for my Valentine. I decided to have another go, this time using a strong blue presence. (He sees blue very well.)
The result (right) takes care of several of the earlier problems. Gone are the wispy tendrils of white. The beads now line up (mostly), and they're dangling from shiny strips of satin. There is definitely blue in the mix. ...The tassel still needs its final trimming -- but I like it.
(Happy Valentine's Day, dear!)
The construction of this tassel was easier than the first pink-and-red effort, mainly because of the way the little dangly beads were put in place. Instead of winding beaded strands with the ruff, I wound them with the overskirt, laying a short strip of ribbon in with one wrap, its centre located at the top where it would be caught by the twining wire. That let half the ribbon dangle down the "face" of the skirt, with the other half of the ribbon sticking upward above it. With the next wrap of overskirt, I folded that second half of ribbon down again and caught it in place with the wire. Presto: an overskirt with beads dangling down on its surface. ...Much less fiddly than trying to do the same thing in the ruff!
If that doesn't make sense to you, I understand perfectly. ;-)
The beads in the tassel are little plastic things sold as "Miracle Beads". They are made in such a way that they catch the light -- not quite as much as the flash in these photos suggests, but almost. It's a nice effect.
I'm away from home, far from my yarn stash, and feeling cramped by a finite palette of yarn. Hence... stay tuned, because some yarn construction is going to happen here really soon!
06 February 2009
The tassel quest is underway!
This first sample (left) is less than magnificent -- but it taught me quite a lot.
The materials are humble, but useful (and inexpensive, so we'll be seeing more of them). The tassel's head is cylindrical, and that nice gimp wrapping masks its true nature: it's a small plastic cap rescued from the discard pile. The skirt and ruffs are made from multipart yarns created on the spinning wheel -- in this case, from nylon floss, a sparkly thread, a metallic machine embroidery thread, and several rayon sewing threads. Some supple white ribbon adds bulk and twirl to the mainly blue skirt.
This first tassel taught me about wrapping yarn onto a tassel mould (more accurately: gluing gimp onto a plastic cap so it looks like a tassel head), making a simple tassel (i.e., the skirt) to slide inside a tassel mould, and making a ruff. ...That last item is very important, because the ruff makes an enormous difference in the appearance of a tassel. Without a ruff, the tassel is literally less frilly -- but it also has all its joins and junctures visible to the naked eye.
The second attempt (right) followed immediately and addresses several things I didn't like about the first tassel.
First, you'll notice its skirt is fuller. That's because this tassel has a "core" skirt that's fitted into the tassel mould, and also an overskirt -- an extra layer twined with fine wire and literally wired to the lower rim of the tassel mould, on the outside.
Second, the lower ruff on this tassel is made of satin ribbon -- much dressier and more satisfying than the simple yarn ruffs of the first tassel. ...There's a hitch, though: the ribbon is fairly stiff and doesn't fill space as comfortably as the yarn alone did. The solution is in the upper ruff: a mix of ribbon and yarn.
Works like a charm.
Both of these tassels sport cords twisted from the yarns used in the tassel. The cord of the first tassel is supple and smooth. The second tassel's cord used the blue-and-copper threads from the skirt as one ply and a strand of gimp as the second ply -- and the result is stiffer and more textured. (Click on the photos for closer views.)
I can't wait to see where this will take me next. :-)
23 January 2009

New years and new seasons bring new roads for discovery. Sometimes that takes the form of new footwear from your sister (left). Sometimes it's a whole new project, which will lead to many more projects later on.
The first new road for this year involves tassels.
(That's right. Not monkeys -- tassels.)
The reasons for this sudden plunge into the world of tassels are many and unexpected. The most pressing is probably the class scheduled for late March with me as the teacher... but it's not the only one. Tassels had always seemed frivolous to me, but it turns out they're quite interesting. They're highly structured, may be as simple or ornate as your pleasure requires, and thrive on contrasts in colour. They come in all sizes, all shapes -- and just when you think you've found a limit, you can go beyond it. (See?? Interesting!)
Of course, making tassels requires yarn, and that can catch the interest of any handspinner. ;-) Spinning brightens any endeavor, even when starting with commercial yarns. Case in point (right).
This yarn was made from several parts: a pleasant, smooth, variegated dark yarn, a shiny rayon floss, some sewing thread, and a little thread of sparkly Something. The photo on the bobbin shows it after its first twisting -- the elements have all been plied together with a fairly firm twist.
It's interesting that the parts of the yarn don't all "express" themselves after that first twisting. One of the shiny floss elements was fairly light in colour, and it's there, but you see only a hint of it in that first stage.
After the first twisting, the yarn was plied again (S) with enough twist to balance, producing a gleaming cabled yarn (left). And oh my, my, my. If there were any moment when I'd forgotten why I love making yarn, this one would remind me!
This yarn makes me happy. It shines, it's cool to the touch, it moves like a dancer, it has a liquid density that makes it feel alive. It's going to make a splendid tassel.
All I need to do now is start climbing that learning curve. :-)
07 January 2009
Between travels and shows, I haven't had the chance to sit down quietly and report on what's been happening in my workroom (whine). Despite my silence, though, things have been happening.
Take this little weaving, for example (left).
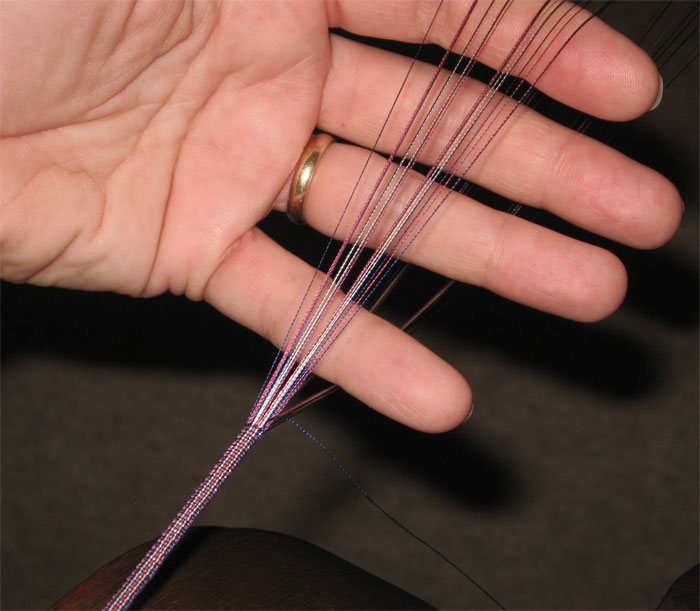
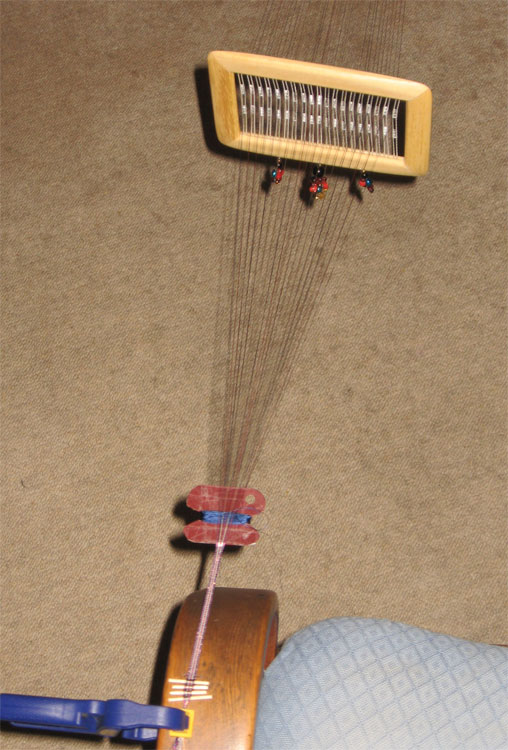
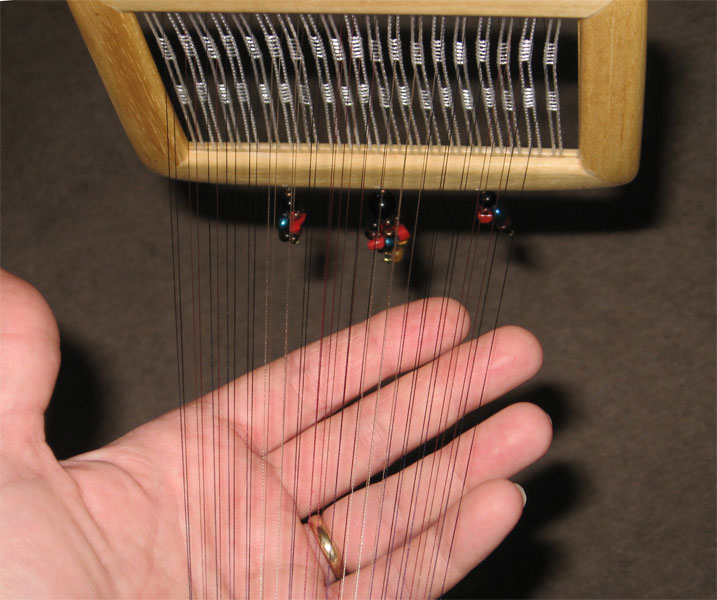
During the first of the autumn shows, I heard myself explaining that the size of a weaving has much to do with the size of the thread used. Most people believed me because I have an honest face. ;-) All the same, I would have liked to have had a fine-thread sample so visitors could see (and feel) exactly how it all worked. ...The upshot: when I returned home I decided to wind a warp of sewing thread and weave it up.
My eyesight is no better than most (and worse than many!), and I found the sewing thread difficult to see while threading the heddle. It was easy to keep track of, though, because I could feel it.
 I worked carefully, threading each thread through the heddle, then "pinning" it to the tabletop with cello tape (this isn't a precise thing -- just a convenience). As soon as all 37 threads of the warp had been threaded, I knotted them together, wove a little header of toothpicks -- and we were in business. :-) The shuttle you see in the photo is a piece of cardboard shaped to suit, its edges smoothed with a layer of cello tape. In a weaving like this, you don't need a shuttle any more high-powered than that.
Before starting to weave, I knew this would work -- but it was even better than I'd imagined. In fact, it was great. The little heddle makes a very clean shed, so once the threads are in place you don't need to see them -- they separate easily into the upper layer and the lower one, and you can feel your way along with no trouble. These were silk sewing threads, and it was a real joy to feel them sliding past each other as I wove.
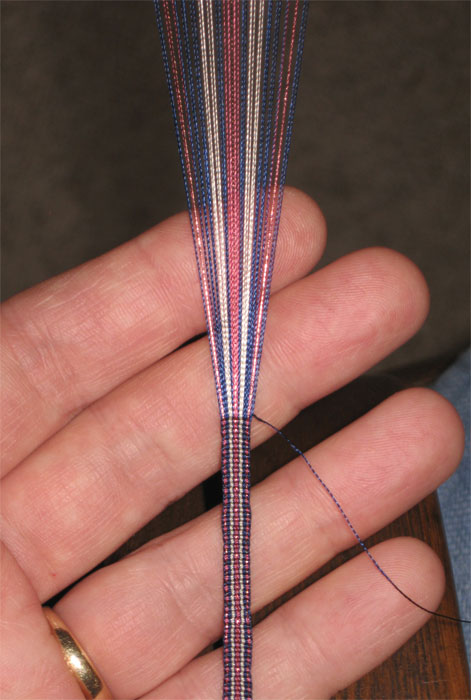
The little ribbon itself is magical. It was thrilling to watch it progress, thread by thread. The weft (also silk sewing thread) packed into place almost effortlessly. It looks like it would take an infinity to produce, but it didn't. I think it took about five minutes to weave an inch -- and I'm a slow weaver. Each inch was completely delightful.
When I finally ran out of warp, I was disappointed that it was over; but the recompense is the ribbon itself. In the hand, it's delicate and light -- and very strong. Its very improbability gives it a special beauty much deeper than its appearance. (Click on the photos for a larger, clearer view.)
Will I do this again, with threads this fine??
The answer: a resounding Yes!
End notes, for inquiring minds
♦ The threads used in this weaving were silk sewing threads manufactured by Gutermann and are available in most sewing stores worldwide.
♦ The semi-rigid heddle shown in these photos is lightweight and hangs on the warp while weaving (yes, it's suspended even when the warp is sewing thread!). These heddles are available for purchase -- click here to learn more.
Return to the Archive directory page
Return to the Now spinning page